2024.11.27
VX Beta Installation and Authorization (Windows)
VX Beta (Windows version) is a plugin software (virtual instrument) for DAWs, available in VST3/AAX formats. As this is a prototype plugin, no support is provided.
VX Beta can be download for free, and you can use VX Beta by using your VOCALOID6 Editor license.
This article explains how to install the Windows version of VX Beta, with the quickstart guide and some notifications for VX Beta.
VX Beta requires a VOCALOID6 Editor license and a VOCALOID:AI voicebank compatible with VOCALOID6 or later. Please complete to install VOCALOID6 Editor and the voicebanks before installing VX Beta.
Contents
1.Confirmation of VOCALOID6 Editor License
2.How to Install VX Beta
2-1.Download VX beta files
2-2.Decompress the files
2-3.Install VX Beta
3.Confirm operation of the VX beta
3-1.Confirming Installation Completion
3-2.Confirming Operation by Launching the VX Beta
1.Confirmation of VOCALOID6 Editor License
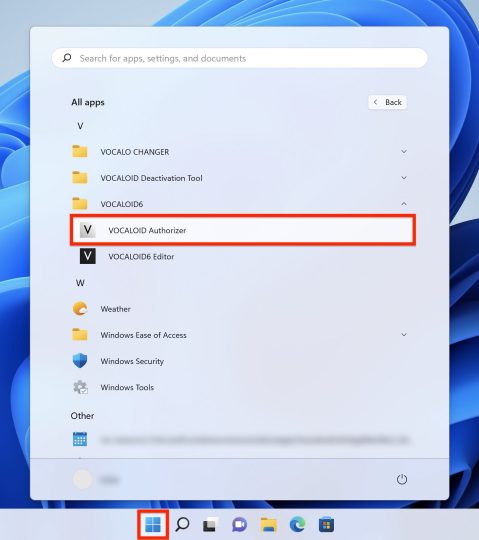
Before installing VX Beta, confirm that your VOCALOID6 Editor license is properly activated. Launch [VOCALOID Authorizer] from [All apps].
Once VOCALOID Authorizer is launched, confirm that the status of "VOCALOID6 Editor" is displayed as "Authorized."
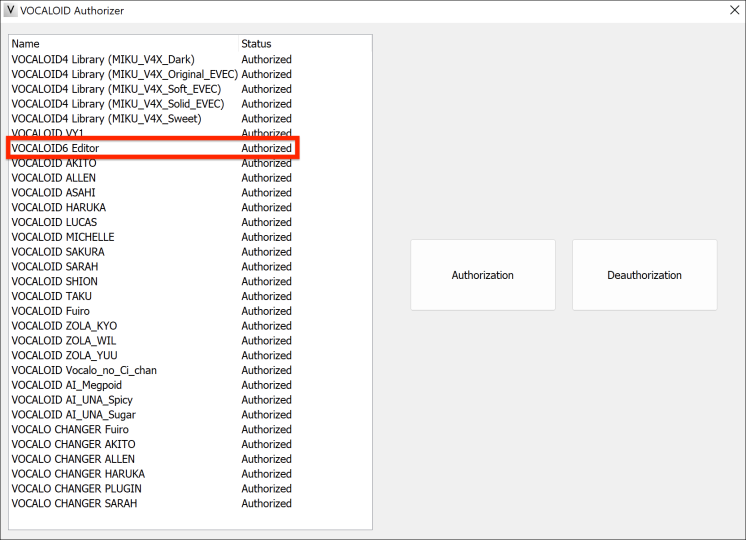
If it is not displayed as "Authorized," please refer to the following article to activate VOCALOID6 Editor.
2.How to Install VX Beta
2-1.Download VX beta files
Please download the Mac version of VX Beta from the following page.
The file size is approximately 52MB. We recommend downloading using a high-speed Internet environment. VX Beta is made for PCs, so please download it on your PC
2-2.Decompress the files
Open the location where the file downloaded in Step 2-1. The downloaded file is compressed in ZIP format and requires "unzip" to use.
*By default, the files are saved in the [Download] folder.
*File names may change depending on when they were downloaded.
*The alphanumeric characters in the file name indicate the software version, which varies depending on when the file was downloaded.
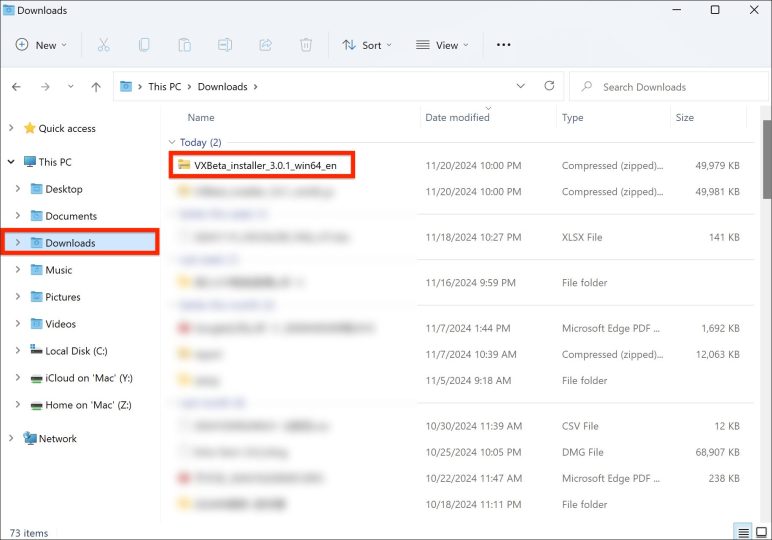
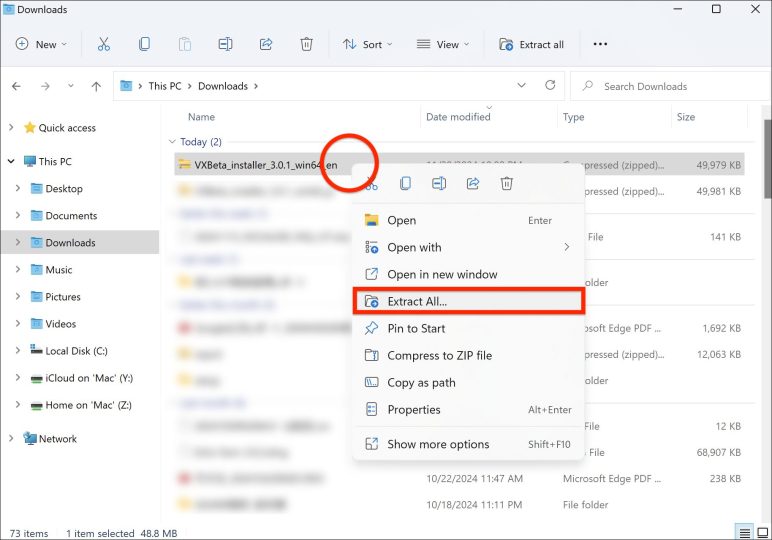
Right-click the file "VXBeta_installer_x.x.x_win64_en" in the folder and select [Extract All] to extract the file.
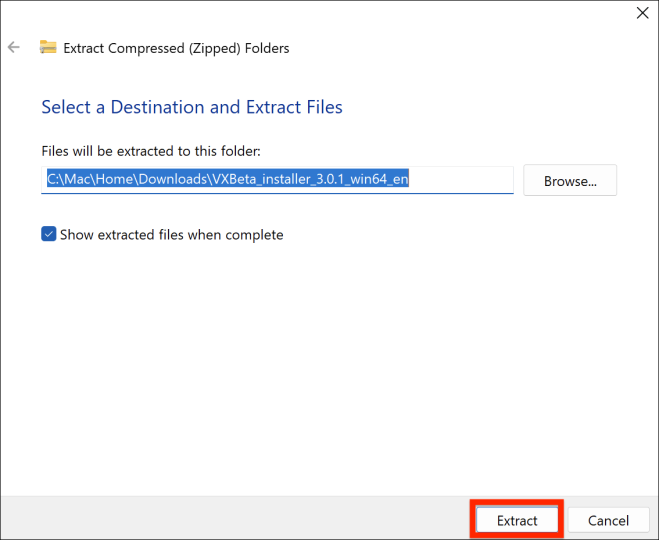
The[Extract Compressed (ZIP Format) Folder] window will appear. You can change the destination of the unzipped files, but you can leave it as it is. If you want to change the destination, select [Browse] and specify the destination.
Once the destination has been set, click on the [Extract].
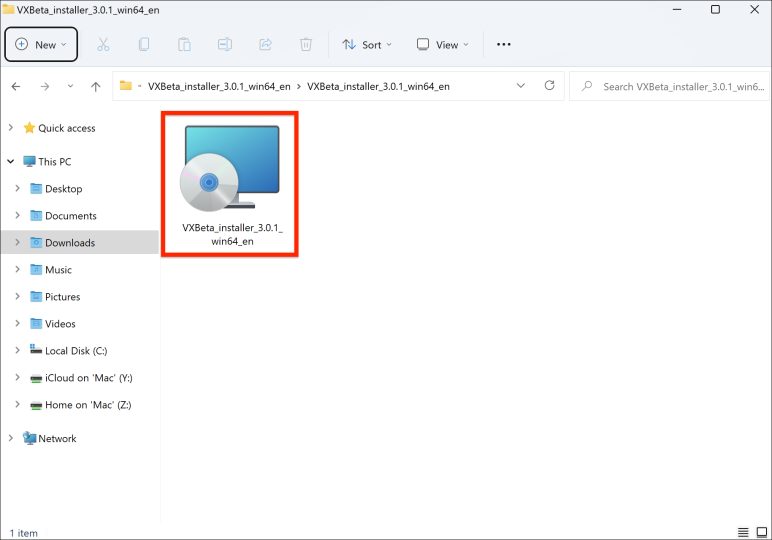
After unzipping, a folder named "VXBeta_installer_x.x.x_win64_en" will be created/displayed. You can find an app which named "VXBeta_installer_x.x.x_win64_en(.msi)," this is the installer app for the VX Beta.
2-3.Install VX Beta
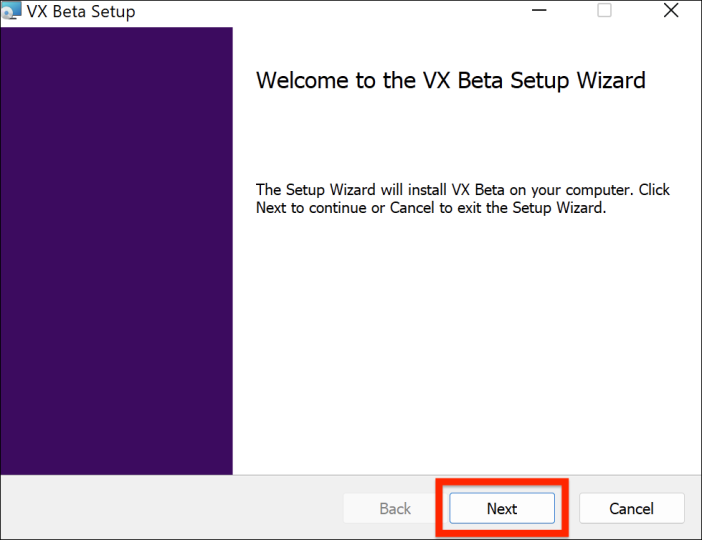
Install the VX Beta. Double-click the VX Beta (English version) installer "VX Beta_en(.msi)" to start it, and the following window will appear. Click [Next].
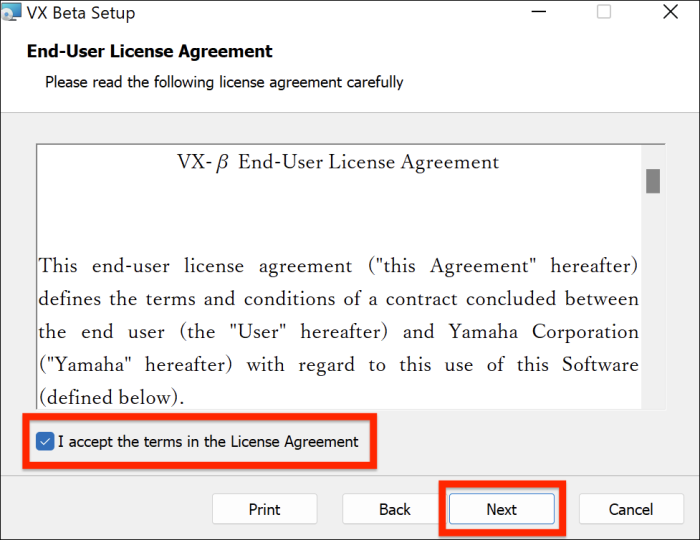
The "VX Beta Product END USER LICENSE AGREEMENT" will appear. This agreement is the one that appears in any computer software. It describes what the user of the software must abide by. Read the contents, then check the box for [I accept the terms in the License Agreement] and click [Next].
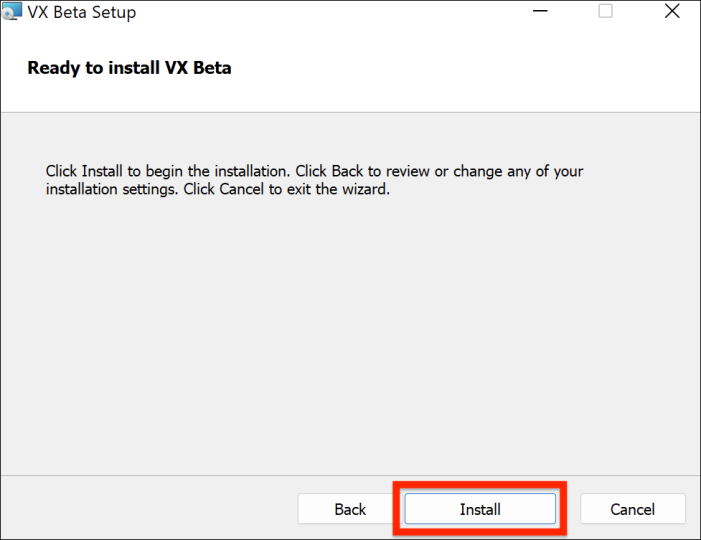
Click [Install], the installation will begin. Please keep the screen open and wait until the installation finishes.
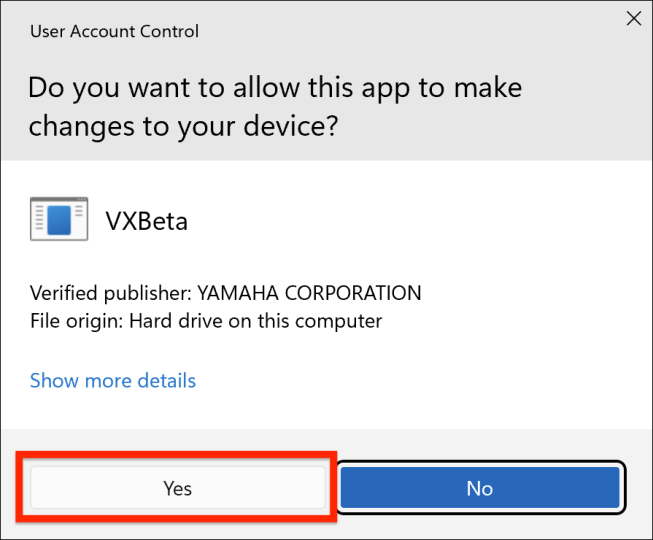
If a "User Account Control" message appears, select [Yes].
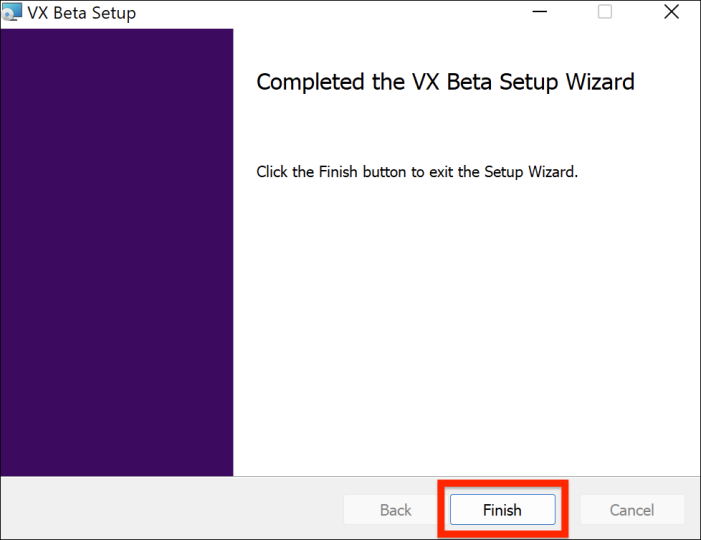
The installation has completed when the following screen is displayed. Select [Finish] to finish the installation process.
3.Confirm operation of the VX beta
Once the installation is complete, let's confirm operation that it is working correctly.
VX Beta is a plugin, so you will need a DAW software that supports VST3/AAX format to use it. The following explanation uses Steinberg Cubase Pro, which supports the VST3 format.
You can check using the same method with Cubase AI, which is included with VOCALOID6 Editor.
3-1.Confirming Installation Completion
In Cubase Pro, you can use the "VST Plugin Manager" to check if VX Beta is correctly recognized.
Create a new project or open an existing project, then launch the [VST Plugin Manager] from the [Studio] menu.
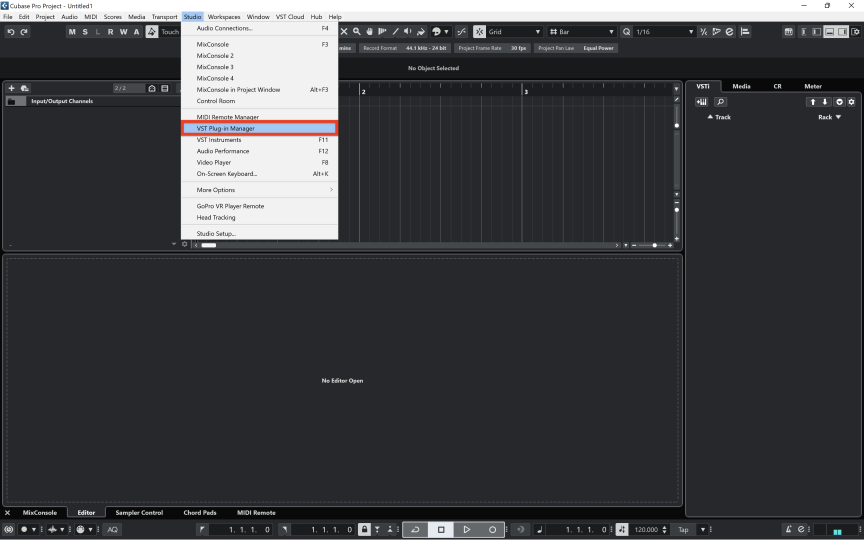
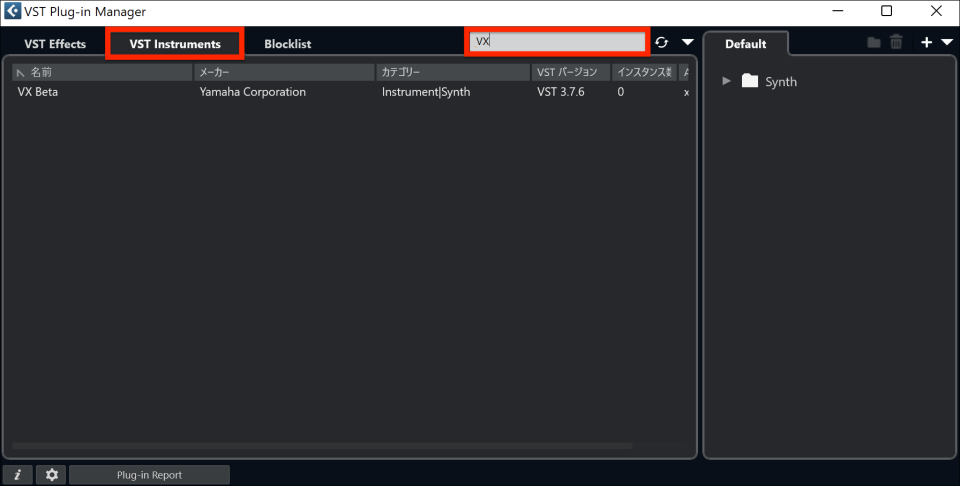
Select the [VST Instruments] tab to see the recognized plugins. Find that "VX Beta" is listed. If there are many plugins and it's difficult to find, you can use the search window to find it.
If it is displayed, the installation has been completed successfully.
3-2.Confirming Operation by Launching the VX Beta
Finally, let's launch the plugin and confirm its operation.
Display the [Right Zone], then select [Add Track Instrument] from the [VSTi] tab.

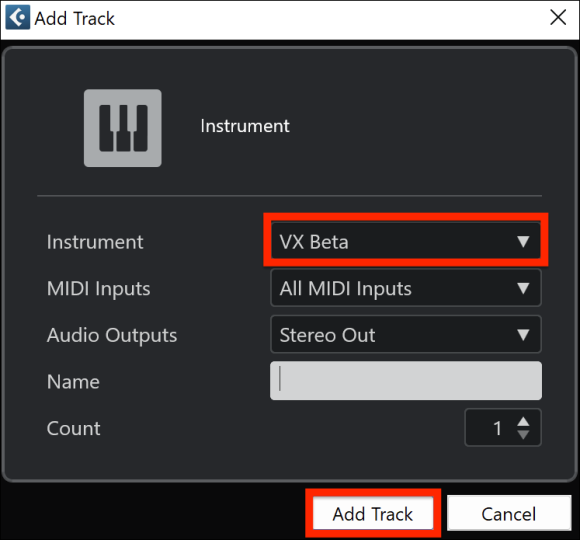
In the "Add Track" window, select [VX Beta] under [Instrument], then click [Add Track].
The VX Beta plugin will launch. Click [Voice Bank] to check if the voice bank is recognized correctly.
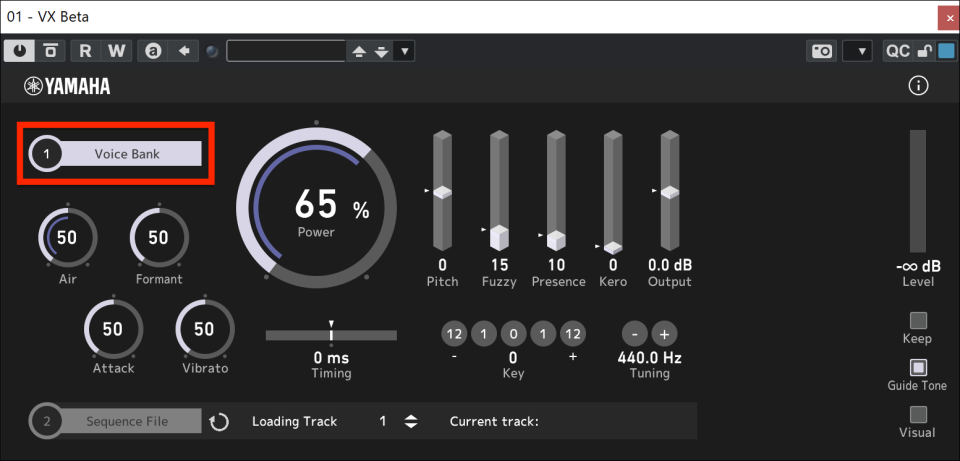
If the voice bank is recognized correctly, all available voice banks will be displayed.
Please note that only VOCALOID:AI voice banks can be used with VX Beta.

Finally, let's input some notes and check if audio is output. When using VX Beta in Cubase, you can input notes using the Key Editor, just like with any other virtual instrument. In the Key Editor, enter the lyrics one character at a time in the [Text] field.
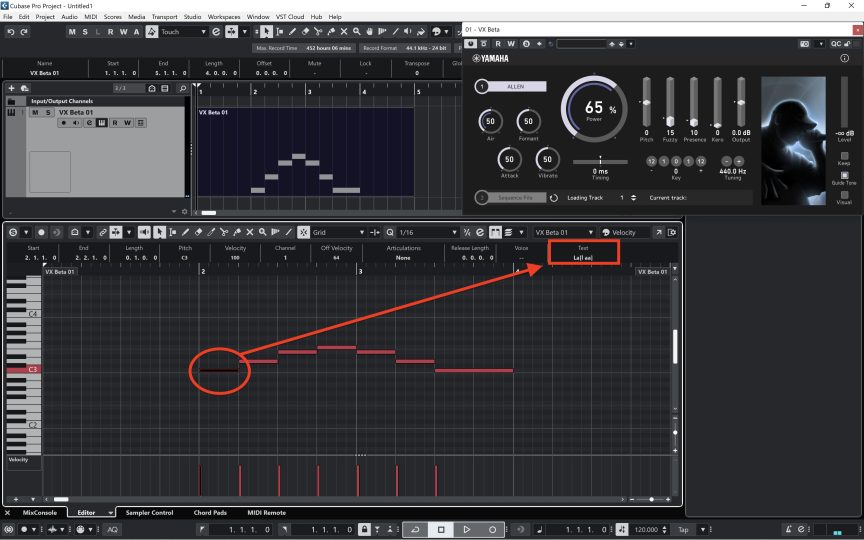
The installation is now complete. Enjoy creating with VOCALOID using VX Beta!